
Overview
This tutorial describes how to setup the Asterisk open source software to create a telephone Private Branch Exchange (PBX) so you can have your own Voice Over IP (VOIP) server. This tutorial also describes how to configure Asterisk to use your Google Voice number to make and receive calls to regular phone numbers on the Public Switched Telephone Network. Following the steps in this tutorial, you will be able to setup your own VOIP network using your home computer.
This tutorial is intended for people with minimal knowledge of Linux and the internet. You should know how to start the linux terminal on your server machines. The instructions in this tutorial will cover all of the commands you must use and the files you must edit to get your phone server up and running on a home computer.
In this tutorial, you will learn:
- How to install the Asterisk Private Branch Exchange (PBX) telephone server software, including the FreePBX web application to administer Asterisk.
- How to setup extensions so you can place a VOIP call to any other users of your telephone server.
- How to configure Asterisk and FreePBX with use your Google Voice number, so you can make and receive calls using regular phone numbers on the PSTN.
- How to update the fail2ban security software to protect Asterisk against brute force attacks from the internet.
Installing Asterisk.
Asterisk telephone server can be installed in one of two ways.
Already built into a Linux distribution:
- Some Linux distributions are pre-built to include Asterisk and in some cases the FreePBX web application as well. For example, one the telephone servers we operate at LittleBytesOfPi.net uses a Raspberry Pi with the RasPBX linux distribution available here: http://www.raspberry-asterisk.org
Install Asterisk and FreePBX from from the command line:
- To download the source code and build Asterisk and FreePBX from the command line, you can follow the instructions here: https://wiki.freepbx.org/display/FOP/Installing+FreePBX+14+on+Ubuntu+18.04.
- You can cross reference with this setup tutorial that worked for us here: https://websiteforstudents.com/how-to-install-freepbx-on-ubuntu-18-04-16-04/ .
Remember, it is important that you enable ‘app_macro’ during the make menuselect step.
Configure Asterisk With FreePBX
SIP Setup and Extensions
Once Asterisk is installed, you need to configure some basic functions before you can start making calls. The first thing you must do is to create an extension for each separate phone on the network. Asterisks supports a number of different connection types, but the most simple is the Session Initiation Protocol (SIP) extension.
- Log into the FreePBX software by entering the address of the computer in a web browser.
- If you are on the computer where Asterisk and FreePBX is installed, enter “http://localhost” into the browser address bar. If you are on another computer in the local network, enter “http://192.168.1.201” or whatever the computer’s local address is.
- The first time you open FreePBX, you are prompted to make a user name and password for the administrator. Make sure to write these down somewhere.
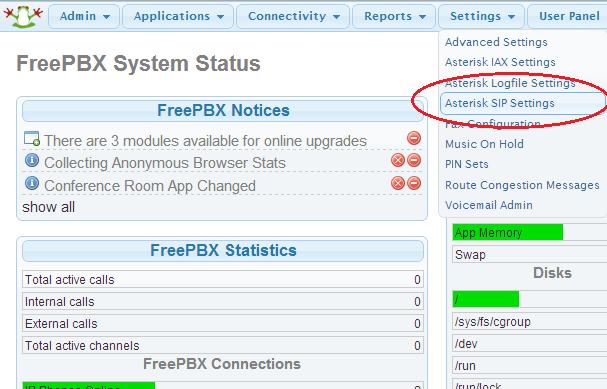
- Once you log in, you will see the system status page. The first thing we need to do is to configure the SIP settings. From the menu, tap Settings and then Asterisk SIP Settings.
- At the top of the page, set NAT to yes, and then tap the Auto Configure button. This should detect your external IP address and the local network If it does not work, determine your external IP address by going to www.whatsmyip.org. The Local Networks should be your Local Area Network, which is usually the address of your router with the last number replaced by 0.
- Scroll to the bottom of the form, and hit the Submit button. You will then notice a red button on the top that says Apply Config. Tap the Apply button to commit the change.
- For this particular setting to take effect, you must also restart Asterisk. From the command line enter:

$ sudo amportal restart
- The next step is to create some extensions, one for each phone you will connect to your server. From the menu, tap on Applications and Extensions:

- Select Generic Sip Device and tap Submit
- Fill in the top part of the form. The User Extension field is the number of this extension, give it some number starting with 10 (so it is not confused with a telephone number). The Display Name field is the name that will appear when calling from extension to extension on your PBX. The Caller ID Num Alias is the number that will show up for calls on the PBX. The SIP Alias is a shortcut number to dial to get this extension. In this example, you could reach this extension by dialing either “10612” or by dialing just “612”. Set the Outbound CID to the same as the SIP Alias


- Leave the next section defaults, and scroll down to the Device Options. Enter a password for this extension in the secret field. If you are going to open up your server to the internet, make sure you use a strong password. Set the nat (Network Address Translation) to “Yes”.
- You can leave the rest of the settings as the defaults, unless you also want voicemail for this extension. To enable this, find the Voicemail section, and set the status to “Enabled”, then enter a password for the voicemail box (the extension user can change it later using the keypad of their extension phone).


- Scroll to the bottom of the form, and hit the Submit button. You will then notice a red button on the top that says Apply Config. Tap the Apply button to get the change to take effect
- Repeat the steps 4 through 8 to create extensions for all of the phones to be connected to the server. The extensions page will show all of the extensions you have created.

Your Asterisk server is ready to make calls from one extension to another on your LAN. You will need to configure two or more softphone clients to use as extension devices. There are a number of ways you can do this:
Your Asterisk server is ready to make and receive calls on any one of the extensions you have created. The next step is to configure SIP phones and connect them to each extension so you can begin making calls.
You can connect any SIP enabled device to your extensions. Three options are described below.
IP Phone:
Asterisk can work with most types of Internet Protocol (IP) phones. You can get an IP phone from an office supply retailer. We use the Digium D40 IP phone as an extension for some of our Google Voice numbers.

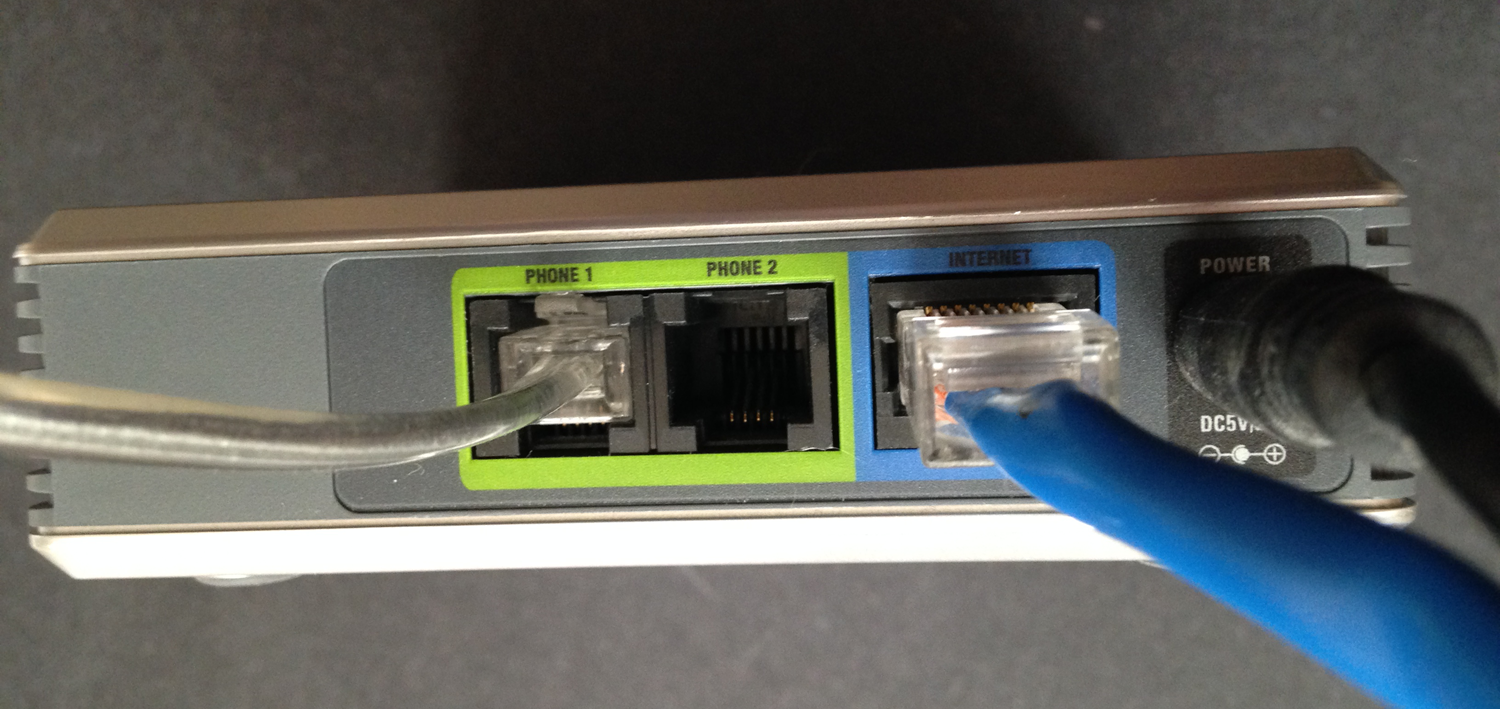
Your other option is to use an Analog Telephone Adapter (ATA) to turn your ordinary old telephone into an IP phone extension. We use a Cisco 2 Line ATA, available for about $35.

This device has an ethernet plug and two phone extension plugs on the back. Simply connect it to your LAN, plug in your phone, and you are ready to configure a SIP extension.
You usually connect to the phone by typing its IP address into your web browser in the same way you configure your home router. Different models will have different configuration user interface, but in general you need to setup only three things: address of the computer running Asterisk on your LAN, name of the extension, and the password.
For example, the configuration page for the Digium IP phone is shown below. The IP address goes in the ‘Host Name’ field, and the extension number is used for the User Name.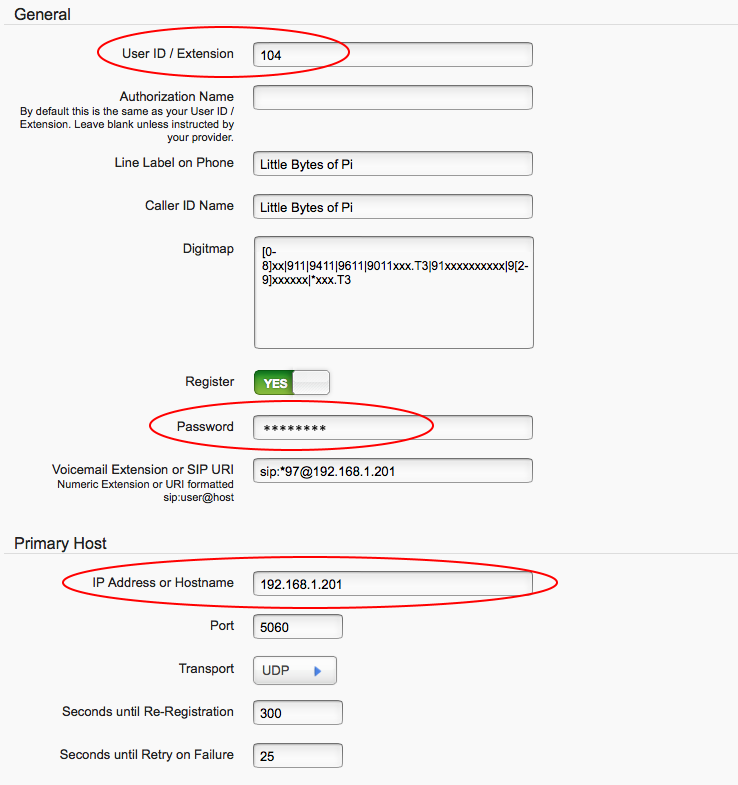
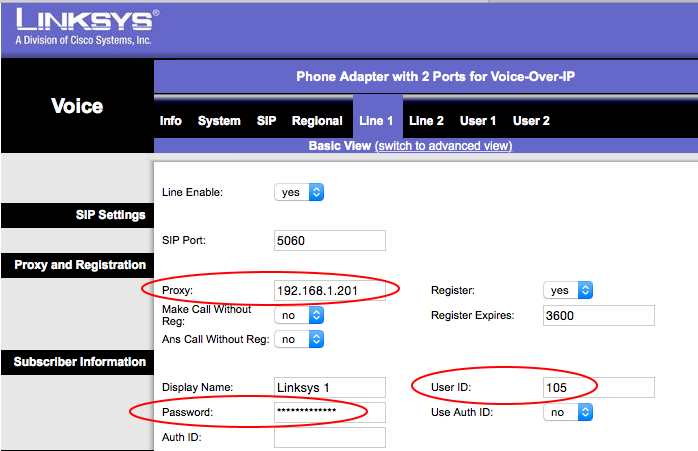
To configure the Cisco ATA adapter enter the IP address in the ‘Proxy’ field, and the extension number in the ‘User ID’ field.
Get an App:
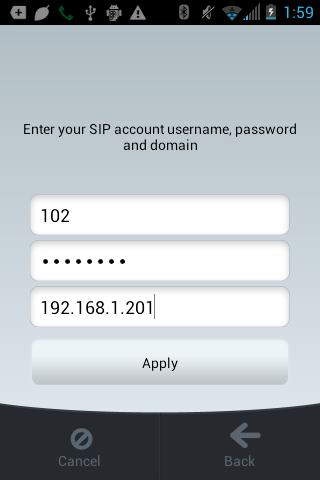
You can get a SIP client application for the iPhone, Android, or the PC from a number of different sources. We have tested the Linphone iOS and Android application using Asterisk on Raspberry Pi, and had good results. The configuration is similar to the IP phone configuration described above. You need to enter the IP address, user name and password in the settings:

Built into Android
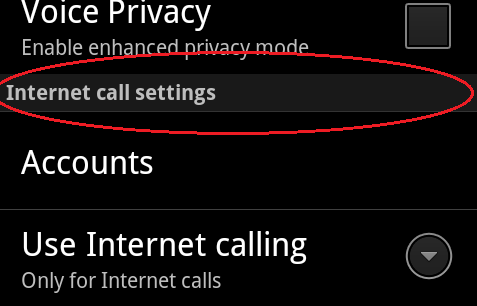
- Some Android devices have SIP client capability built into the operating system. Go to the normal dialer, hit settings, and if you see the following section, then you can use the phone’s built in dialer as a SIP client.
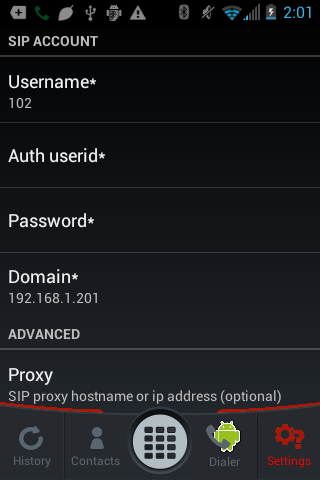
Tap Accounts, and enter the Username (your full extension number), the Password (your secret), and the Server (address of the computer on your LAN such as 192.168.1.201). You can leave the other settings as default.

Get an app:
- You can get a SIP client application for the iPhone, Android, or the PC from a number of different sources. We have tested the Linphone iOS and Android application with Asterisk with good results.
Using Google Voice with Asterisk
If you want to make calls on the real telephone network, you will need a route for your Asterisk server to connect to the Public Switched Telephone Network (PSTN). There are a number of VOIP providers that offer this service. If you are in the United States, you can use your Google Voice account to do this for free*.
*Note: Google announced that as of May 15, 2014, they will no longer support XMPP based calling with Google Voice. This day came and went and the service continued to work. However, a few years later the free ride came to an end and Google quietly stopped supporting XMPP in July 2018. This next section is retained for nostalgia purposes.
To determine if you can use your Google Voice number with asterisk, login to your google account, and go to http://voice.google.com. If you see an option to Forward calls to Google chat, then check that option and you can then configure your Asterisk server to use your Google voice number.
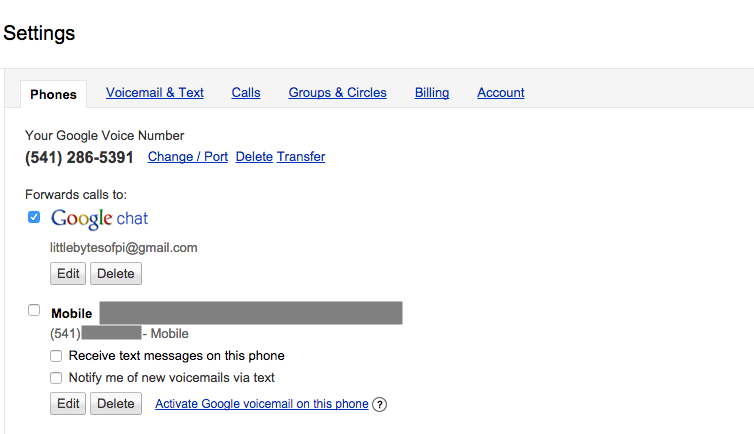
Although you must link your Google Voice number to another phone number in order to create an account, you can choose if you want to keep these numbers connected together. Uncheck your other phone if you don’t want to have Google Voice calls also ring on this number. It is also possible to delete this number from your Google Voice account; your Google Voice number will still work even if there is no other number connected to the account.
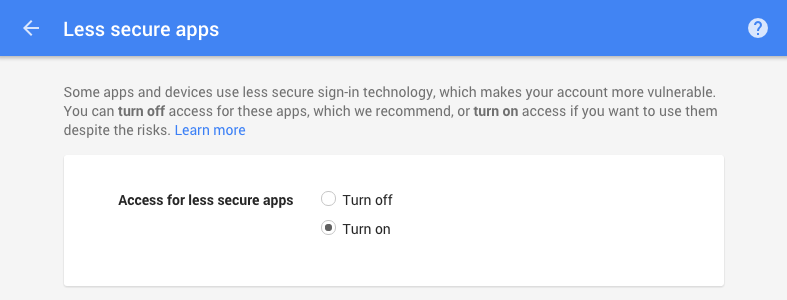
You must set your Google account to allow ‘less secure apps’ in order for the Asterisk server to connect to your Google Voice account. Enter this link into your browser:
Enable access for less secure apps on this page.
Configure Google Voice
To configure Google Voice in Asterisk:
- From the Connectivity menu, choose Google Voice (Motif)

Note: If this menu item is not there, go to the Admin menu and select Module Admin. Make sure Unsupported is selected and then search for the Google Voice module. You can install it from the GUI on the Module Admin page.
- Enter your google account name (usually your gmail address), the password for this Google account, the Google Voice phone number (including the 1) with no dashes. Click Add Trunk and Add Outbound Route. Click on the Submit button and then Apply Config.
- The final step is to add an Inbound Route. Go to the Connectivity menu and select Inbound Route.
- Enter a description for this route, and then enter your 11 digit Google Voice number.
- Leave the remainder of the form with the default values, except the last field called Set Destination. Choose an extension to ring for this number.


Note: If you want all extensions to ring when this number is called, then go the Applications menu and select Ring Group.
You should now be able to make and receive calls with your Google Voice number using your Asterisk server and SIP phones connected to your computer’s LAN. Because the server is on the inside of your router firewall, it is secure from the internet, so you do not need to worry about additional security.
If you want to be able to use your server to make calls with SIP phones connected from anywhere, then the next step will be to expose the server to the internet through your router firewall. The last section of this tutorial describes how to secure your Asterisk server and open up the required ports so you can make calls from anywhere you are connected to the internet.
Operating Asterisk on the Internet
As soon as you expose your Asterisk server to the internet, you will be able to make calls from anywhere you are connected. However, this also means that anyone else who guesses a valid user name and password can also use your system. In order to prevent ‘brute force’ attacks where hackers try to guess a valid user name and password with multiple attempts, you should configure the fail2ban software to monitor Asterisk.
You can read about how to install fail2ban in our tutorial here.
The latest release of the fail2ban daemon includes jails and configuration files for Asterisk by default. In order to enable fail2ban for asterisk:
1. Open up the fail2ban jail configuration file
$ sudo nano /etc/fail2ban/jail.local
2. Find the sections (jails) labeled [asterisk-tcp] and [asterisk-udp]
3. Change the enabled = false to enabled = true.
4. Restart the fail2ban monitor
$ sudo service fail2ban restart
In earlier versions of fail2ban, you had to create the jail and filter files yourself using the steps described below. This section is retained in this tutorial in order to provide more details of what is happening behind the scenes when you enable the fail2ban jail for asterisk.
To enable Asterisk monitoring with fail2ban, you must create the filter and then enable the jail.
- Create a new file for the Asterisk failure regular expressions.
$ sudo nano /etc/fail2ban/filter.d/asterisk.conf
- Paste in the contents of the filter file (see appendix). Save the file and quit the text editor.
- Now create the asterisk action file
$ sudo nano /etc/fail2ban/action.d/iptables-asterisk.conf
- Paste in the contents for this file (see appendix). Save the file and quit the text editor.
- Now configure the jail.
$ sudo nano /etc/fail2ban/jail.conf
- Insert the following lines to create an Asterisk jail.
[asterisk]
enabled  = true
filter   = asterisk
action   = iptables-asterisk[name=asterisk]
        sendmail[name=Asterisk getac6, dest=yourmail@gmail.com, sender=yourmail@gmail.com]
logpath  = /var/log/asterisk/security_log
maxretry = 3
bantime  = 600
- Restart fail2ban for the changes to take effect.
$ sudo /etc/init.d/fail2ban restart
If you have configured fail2ban to send you an email, you should get a notification that the jail has started.
All that remains to make your server visible from anywhere on the internet is to configure your router port forwarding and the server firewall. You can find instructions and an example for opening up your SIP ports in our tutorial here.
References and Additional Reading
Appendix: Fail2Ban Files
/etc/fail2ban/filter.d/asterisk.conf
#######################################################
# Fail2Ban configuration file
#
# reference: http://www.voip-info.org/wiki/view/Fail2Ban+(with+iptables)+And+Asterisk
#
# $Revision$
#

[INCLUDES]

# Read common prefixes. If any customizations available -- read them from
# common.local
before = common.conf

[Definition]

# Option:  failregex
# Notes.:  regex to match the password failures messages in the logfile. The
#          host must be matched by a group named "host". The tag "" can
#          be used for standard IP/hostname matching and is only an alias for
#          (?:::f{4,6}:)?(?PS+)
# Values:  TEXT
#
failregex = NOTICE%(__pid_re)s .*: Registration from '.*' failed for '' - Wrong password$
            NOTICE%(__pid_re)s .*: Registration from '.*' failed for '' - No matching peer found$
            NOTICE%(__pid_re)s .*: Registration from '.*' failed for '' - Username/auth name mismatch$
            NOTICE%(__pid_re)s .*: Registration from '.*' failed for '' - Device does not match ACL$
            NOTICE%(__pid_re)s .*: Registration from '.*' failed for '' - Peer is not supposed to register$
            NOTICE%(__pid_re)s .*: Registration from '.*' failed for '' - ACL error (permit/deny)$
            NOTICE%(__pid_re)s  failed to authenticate as '.*'$
            NOTICE%(__pid_re)s .*: No registration for peer '.*' (from )$
            NOTICE%(__pid_re)s .*: Host  failed MD5 authentication for '.*' (.*)$
            NOTICE%(__pid_re)s .*: Failed to authenticate user .*@.*$
            NOTICE.* .*:  failed to authenticate as '.*'
            NOTICE.* .*:  tried  to authenticate with nonexistent user '.*'
            SECURITY.* .*: SecurityEvent="InvalidAccountID",.*,Severity="Error",Service="SIP",.*,.*,.*,.*,RemoteAddress=".*/.*//.*"
            SECURITY.* .*: SecurityEvent="ChallengeResponseFailed",.*,Severity="Error",Service="SIP",.*,.*,.*,.*,RemoteAddress=".*/.*//.*"$
            SECURITY.* .*: SecurityEvent="InvalidPassword",.*,Severity="Error",Service="SIP",.*,.*,.*,.*,RemoteAddress=".*/.*//.*",.*

# Option:  ignoreregex
# Notes.:  regex to ignore. If this regex matches, the line is ignored.
# Values:  TEXT
#
ignoreregex =
#
#################################################
/etc/fail2ban/action.d/iptables-asterisk.conf
<pre class="wp-block-syntaxhighlighter-code">################################
# Fail2Ban configuration file
#
# Author: Razvan Turtureanu
# http://sourceforge.net/p/raspbx/discussion/tutorials/thread/6288a838/
# $Revision$
#
[Definition]
# Option: actionstart
# Notes.: command executed once at the start of Fail2Ban.
# Values: CMD
#
actionstart = iptables -N fail2ban-
iptables -A fail2ban- -j RETURN
iptables -I -p tcp --dport 5061 -j fail2ban-
iptables -I -p udp --dport 5060 -j fail2ban-
iptables -I -p tcp --dport 5060 -j fail2ban-
# Option: actionstop
# Notes.: command executed once at the end of Fail2Ban
# Values: CMD
#
actionstop = iptables -D -p tcp --dport 5061 -j fail2ban-
iptables -D -p udp --dport 5060 -j fail2ban-
iptables -D -p tcp --dport 5060 -j fail2ban-
iptables -F fail2ban-
iptables -X fail2ban-
# Option: actioncheck
# Notes.: command executed once before each actionban command
# Values: CMD
#
actioncheck = iptables -n -L | grep -q fail2ban-
# Option: actionban
# Notes.: command executed when banning an IP. Take care that the
# command is executed with Fail2Ban user rights.
# Tags: IP address
# number of failures
# &amp;amp;lt;time&amp;amp;gt; unix timestamp of the ban time
# Values: CMD
#
actionban = iptables -I fail2ban- 1 -s -j DROP
# Option: actionunban
# Notes.: command executed when unbanning an IP. Take care that the
# command is executed with Fail2Ban user rights.
# Tags: IP address
# number of failures
# &amp;amp;lt;time&amp;amp;gt; unix timestamp of the ban time
# Values: CMD
#
actionunban = iptables -D fail2ban- -s -j DROP
[Init]
# Defaut name of the chain
#
name = default
# Option: chain
# Notes specifies the iptables chain to which the fail2ban rules should be
# added
# Values: STRING Default: INPUT
chain = INPUT
#################################</pre>