
Overview
This tutorial describes how to install an apache web server and a WordPress website. Following the steps in this tutorial, you will be able to run a webserver on home computer and install the WordPress website builder web application
This tutorial is intended for people with minimal knowledge of Linux and the internet. You should know how to start the linux terminal on your server machines. The instructions in this tutorial will cover all of the commands you must use and the files you must edit to get your website setup and running on a home computer.
In this tutorial, you will learn:
-
How to install the LAMP stack (Linux, Apache, Mysql, Php) on a linux computer.
-
How to use a dynamic dns service to have your website name directed to your home router address even when your address changes.
-
How to install the wordpress website builder application.
-
How to configure the local hosts file so your website functions on your LAN as well as the internet.
This tutorial is written for a Debian based Linux (such as Ubuntu or Mint). For other types of Linux, you will have to adapt some of the install instructions.
Before You Start
If you are not an IT pro, or unless you are adventurous and laugh in the face of danger, then you should never operate servers exposed to the internet on the same local area network (LAN) where you have your personal computers. If you want to operate web servers from your home internet connection, I recommend that you use multiple routers to create a secure setup. Setting up your home routers to create a secure isolated subnetwork is described in our first tutorial.
If you wish to administer your webserver machine from a computer on an isolated side of your network, you should also read our tutorial about router port forwarding and firewall configuration.
Installing LAMP
Install Apache Server
One of the most common web server programs is apache. The following instructions are adapted from a reference http://community.linuxmint.com/tutorial/view/486 that worked without problems when we tried it on Linux mint.
-
Open a terminal and type (or cut and paste):
$ sudo apt-get install apache2
-
To test the installation, open up a web browser and then enter “http://localhost”. You should see a simple web page that says “It Works”. You can also open up a web browser on another machine on your LAN and enter “http://192.168.1.201” (enter the address of the web server computer), and you should see the same page.
Install PHP
-
Open a terminal and enter:
$ sudo apt-get install php5 libapache2-mod-php5
-
Restart the Apache server
$ sudo /etc/init.d/apache2 restart
-
To test the PHP installation, create the following file:
$ sudo nano /var/www/testphp.php
-
Copy/Paste this line into the phptest file:
<!--?php phpinfo(); ?-->
-
Save and close the file.
-
Enter “http://localhost/testphp.php” into the address bar of your web browser. You should see a page with all the php information.
Install MySQL
-
Open a terminal and enter:
$ sudo apt-get install mysql-server
-
Now create a user for the mysql databasel:
$ mysql -u root
Following that copy/paste or type this line:
mysql> SET PASSWORD FOR 'root'@'localhost' = PASSWORD('yourpassword');
(Make sure to change yourpassword to a password of your choice.)
-
Install the php admin tooll:
$sudo apt-get install libapache2-mod-auth-mysql php5-mysql phpmyadmin
-
To get PHP to work with MySQL, we will need to open a file entitled php.ini:
$ sudo nano /etc/php5/apache2/php.ini
-
Change this line by removing the comment:
;extension=mysql.so
To look like this:
extension=mysql.so
-
Restart Apache, and you are done.
$ sudo /etc/init.d/apache2 restart
Getting an Address and Dynamic DNS
Your website will need an address, so when people enter “www.yourwebsite.com”, they are directed to the address of your internet connection where your web server is running. There are many companies online that will register a domain name for as little as $10 per year.
Once you have a domain name, you will need to point it to the address of your modem. The problem is that most home internet service providers (ISPs) give you a dynamic IP address, which means that it can change at any time. To address this problem, you can use a dynamic DNS service. A dynamic DNS service will take care of updating the address associated with your domain name in the event that your internet modem gets a new address from your ISP.
For the LittleBytesOfPi.net website, we use dnsExit.com to provide dynamic DNS. This is the only free dynamic DNS service that allows you to use your own domain name. For our home website project, we reassigned our already registered .net domain name to point to our home internet address using dnsExit.com’s service.
To setup dynamic DNS using dnsExit.com:
-
Create a DNS for the domain here.
-
Install a dynamic DNS update client on at least one of your home servers using the instructions here. This software will contact your dynamic dns provider when your home internet address changes, and they will update their name servers accordingly.
Installing WordPress
WordPress is an open source web page content management tool and blog website builder. It is the tool used to create and manage the LittleBytesOfPi.net website. To install wordpress:
-
Create a temporary directory and download the wordpress files
$ cd /tmp/ &amp;amp;&amp;amp; wget http://wordpress.org/latest.tar.gz
-
Extract the wordpress files to the /var/www directory
sudo tar -xvzf latest.tar.gz -C /var/www/
-
Make the uploads folder, and set file premissions
$ sudo mkdir /var/www/wordpress/wp-content/uploads
$ sudo chmod -R 777 /var/www/wordpress/wp-content/uploads/
-
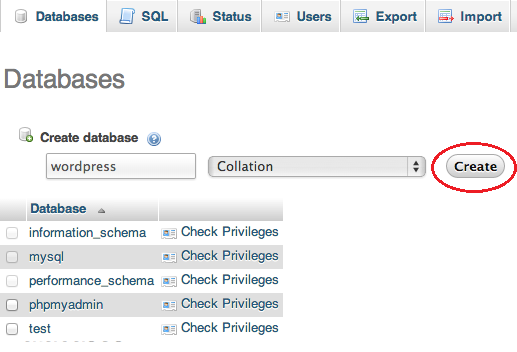
Create a database for the wordpress site to use. Open a web browser and enter “http://localhost/phpmyadmin”
-
Login as ‘root’ and use the password you setup during the php installation process above.
-
Create a new database for the wordpress site, in this example the database is called wordpress:
-
Now it is time to setup the WordPress site. Open your browser and enter “http://localhost/wordpress” in the address bar.
-
At the prompt, tap the button that says [Create a Configuration File].
-
Fill in the configuration file parameters on the next page. Note, you may wish to change the table prefix from the default. This will be necessary if you want to run multiple WordPress sites from this server. It is also helpful to cut down on hacking attempts.

-
Finish the installation wizard, and then open a browser at “http://localhost/wordpress”. Tap the login link to login and begin building your site.
Setting Up Host Files
You will have no problems operating your site from any computer on the same LAN, but you will notice that if you access your site from the internet, or from computers on another LAN, that the links do not work. To fix this, you must update the site’s configuration.
-
Login to the site as an administrator
-
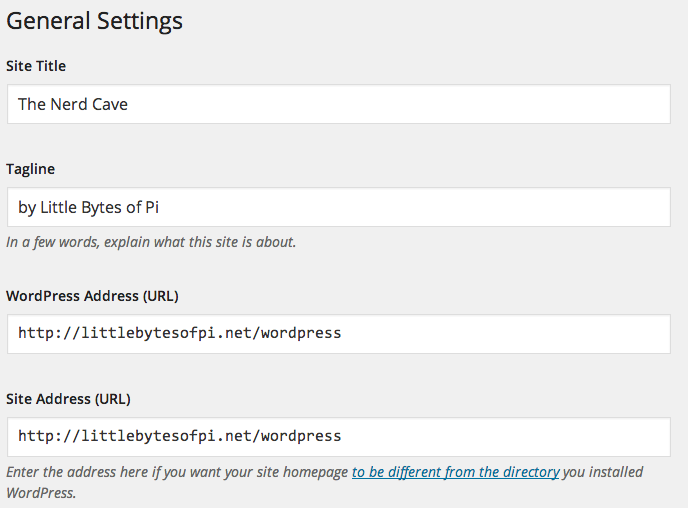
On the General Settings page, notice that the WordPress address and the Site URL are the address of your local machine.

-
Edit these two fields to be the domain name of your site:

-
Your site will now work when accessed from the internet, but you will now have a problem operating it from machines on the LAN. To solve this, simply edit the /etc/hosts file on the webserver machine, and add your website name to map to the loopback address.
$ sudo nano /etc/hosts
Add a line to map your website back to the local host loopback address:
#the localhost entry will exist already
127.0.0.1       localhost
#add an entry for your website to map to localhost
127.0.0.1       littlebytesofpi.net
You should consider installing the fail2ban plugin for WordPress to protect against brute force login attempts.