
Overview
This tutorial describes how to configure your home routers to forward ports from the internet to servers behind your home’s internet connection. Following the steps in this tutorial, you will be able to access computers located in your home the internet. This would allow you to operate any number of different internet services from computers in your home, such as a web server or VOIP service
This tutorial is intended for people with minimal knowledge of computer networks, firewalls, or routers. You should know how to log into the configuration page of your router with a web browser, and you should also know how to start the linux terminal on your server machines. In this tutorial, you will learn:
- How to set a specific local network address for your computers using either DHCP reservations at your router or static IP address configured at the computers.
- How to forward a port from the internet through your master router to a server on your network.
- How to forward a port from your isolated network through one of the secondary routers to a server on your network.
- How to use the Linux Uncomplicated Firewall (ufw) command line interface to open up the required ports on your server
- How to configure SSH server to use ports other than the default port 22.
Before You Start
If you are not an IT pro, or unless you are adventurous and laugh in the face of danger, then you should never operate servers exposed to the internet on the same local area network (LAN) where you have your personal computers. If you want to operate web servers from your home internet connection, I recommend that you use multiple routers to create a secure setup. Setting up your home routers to create a secure isolated subnetwork is described in the previous tutorial.
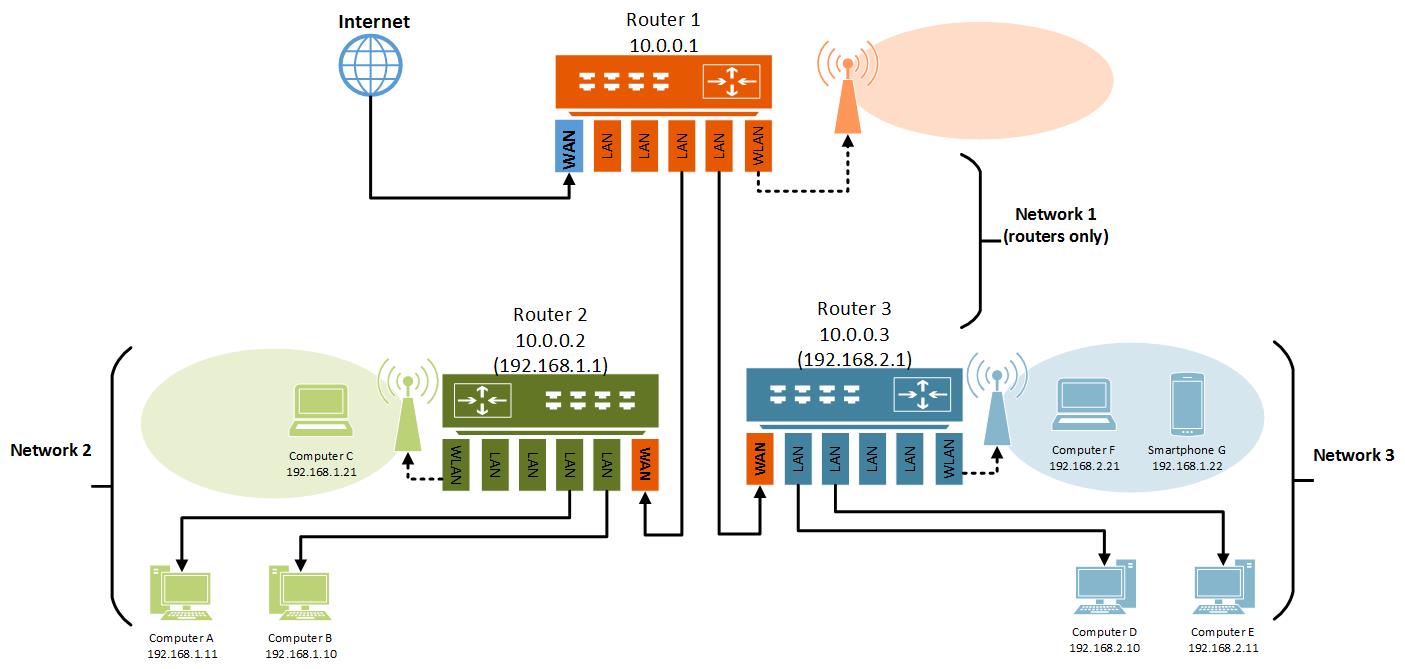
In this tutorial, we will assume you have a three router ‘Y’ configuration. If you are using two routers, you can adapt these instructions to your case.
Assigning Fixed Local Addresses
If you wish to configure computers to talk to each other across the isolated sub-networks, you will have to configure firewall rules to allow the traffic to pass through the isolating modem. Before you do create firewall rules, it is usually advisable to assign certain computers a fixed address in the local network.
There are two ways to do this: use a reserved DHCP address in the router, or assigned a fixed address at the computer.
- DHCP reservation is done using the router’s configuration page. It is the easiest way, and is the best solution for computers that will will move around connecting to other local networks.
- Static IP address is set in the individual computer’s settings. It is often used for the wired connection of a computer that is always on in the same network.
Reserved DHCP Address
Most routers that do DHCP serving (assign addresses in the network) will assign an address to a device for a set amount of time before the assigned address needs to be renewed. In most cases, if the device is still plugged into the network when it comes time to renew its address, it will get the same address again. However, it is usually desirable to have a predictable address for at least some of the computers in your network. One way to accomplish this is to ‘reserve’ the DHCP address for a specific computer in the router’s configuration page.
- Login to the router on which the computer is part of the LAN.
- Find the page that has the DHCP settings on it. It is usually associated with the Local Network settings
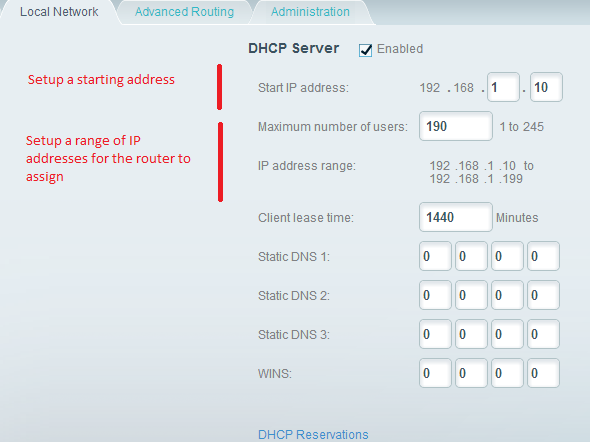
- In my networks, I like to reserve the addresses x.x.x.1 to x.x.x.10 for modems and access points. You can accomplish this by setting the ‘Start IP address’ to x.x.x.10 (192.168.1.10 in this example).
- In my networks, I like to reserve addresses x.x.x.200 to x.x.x.255 for computers with a static IP address set in the machine. You can accomplish this by specifying a limit on the number of DHCP addresses to be assigned by the router.
- Tap on the link that says something like “DHCP Reservations”. In this section, you will be able to reserve a specific IP address for a particular machines in the network. This will force the router to always give this machine the same address from the DHCP address range.
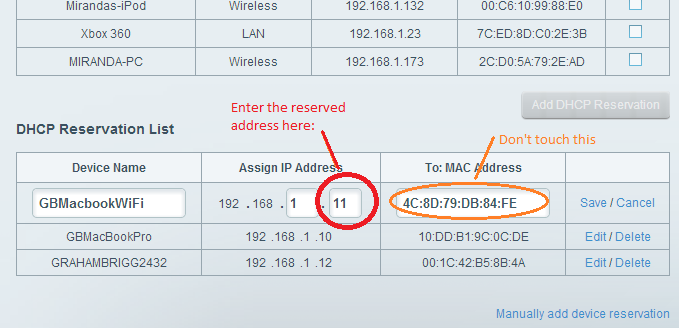
In most cases, you only need to set the last number of the reserved IP address. In this example, GBMacbook has two addresses in the network, the wired address is at 192.168.1.10, and the WiFi address at 192.168.1.11. In almost all cases, you won’t touch the MAC address, just use the MAC address that is provided by the router. The MAC address is a unique identifier for every network interface in the network. If you changed it here, you would also need to change the MAC address of the network interface (wired or wireless) in matching computer as well.
Static IP Address
If you wish to setup a static IP address in the computer’s settings, you must first make sure that this IP address is not being used by another device in the network. It is recommended that you configure the router’s DHCP server range so that you can have a range of addresses that will not be handed out automatically and conflict with any static IP addresses you have setup.
Examples of configuring a static IP address for Mac and Linux are described below:
Static IP Address on Mac
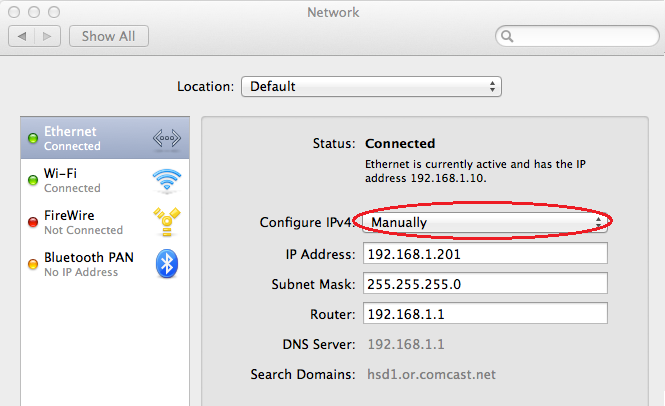
- Go to the System Preferences, and choose Network:
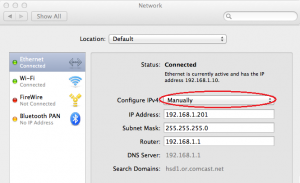
- Set “Configure IPv4” to “Manually”
- Type in the IP address you wish this machine to use. Make sure this will not conflict with an IP address that may be assigned by the DHCP server by using a known range for your static IP machines.
- Leave the subnet mask at 255.255.255.0 unless you have more than 255 machines on this network. That configuration is beyond the scope of this document.
- Set the “Router” address to the address of the router on the LAN.
- Apply the configuration.
Static IP on Linux (GUI)
Many Linux distributions have a GUI similar to the Mac interface for setting a static IP address.
- Go to system preferences and find the “Network” item.
- On the Networking screen, select the wired or wireless interface you want to set the static IP address for, and then click options.
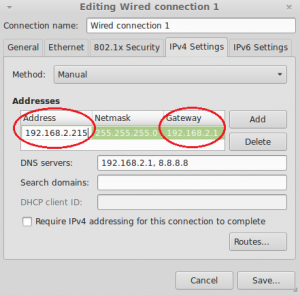
- Set the desired address in the Address column, and set the router’s address in the gateway column. You should set at least the router’s address as the DNS server, in the example above it also sets Google’s DNS server (8.8.8.8) as an alternate.
- Save and close.
- Restart your networking
$ service networking restart
or
$ /etc/init.d/network restart
Static IP on Linux (/etc/network/interfaces)
If you don’t want to use the GUI for static IP address configuration, you can edit the contents of the “/etc/network/interfaces” file.
If your distro is using network manager, this file may be empty, or simply look like this:
#loopback
auto lo
iface lo inet loopback

iface eth0 inet dhcp
iface wlan0 inet dhcp
Edit this file to look like this (replacing 192.168.1.x with the proper static address and the address of your router:
loopback
auto lo
iface lo inet loopback

######  Static IP assignment
# lines with a # are comments and do not need to be copied
auto eth0
allow-hotplug eth0
iface eth0 inet static
# static IP address in the next line
address 192.168.1.201
netmask 255.255.255.0
#gateway is the address of your router
gateway 192.168.1.1
#dns name server is the address of our router
dns-nameservers 192.168.1.1
Restart your networking for the change to take effect.
Configure Router Port Forwarding
By default, a home router will block all incoming traffic from the WAN. Your computers can see out, but no one can see in. This is what prevents your home computers from getting hacked when they are behind your router. If you want to see your server computers from the internet, you will have to open up ports on the router’s firewall to allow the connection to get through.
In this example, we will describe the steps if that you have a three router Y configuration isolating your internet server computers from your private home computers. We will assume that your internet servers are on Network_2 (green), and that your private computers are on Network_3 (blue).
The first step will be to forward ports from the internet through Router_1, and send them to Router_2.
- Login to the settings page of Router_1, which by default will be blocking all incoming connections from the internet.
- Find the configuration page called “Port Forwarding”, or sometimes “Firewall”. You may have to tap a button to see these advanced settings.
- Find the button to add a rule or service. In our configuration, the destination for all ports is the address of Router_2. We will forward the ports from Router_2 to the destination machines in the next step.
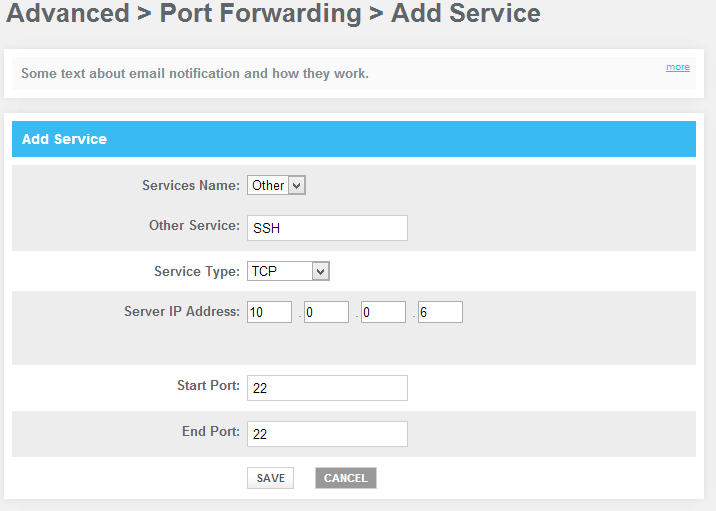
You will need to know which ports are required for the service you are exposing to the internet.
- Add a port forwarding rule for each of the services you are hosting.
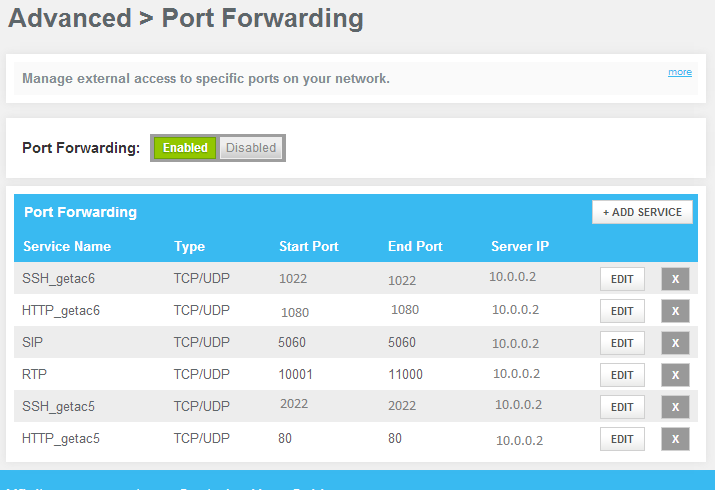
In this example, there are two different machines exposed to the internet. The machine called getac6 runs an Asterisk telephone server for VOIP. The machine called getac5 runs an apache server hosting the LittleBytesOfPi.net WordPress site. The following ports are used:
- Port 1022 is the SSH server port for the machine getac6.
- Port 1088 is the HTTP port for the FreePBX web application used to administer the Asterisk telephone server running on getac6.
- Port 5060 is the SIP connection port for VOIP used by Asterisk.
- Ports 10001 through 11000 are used for VOIP calls when they are active.
- Port 2022 is the SSH server port for the machine getac5.
- Port 80 is the HTTP port for the apache web server running the LittleBytesOfPi.net WordPress site on the machine getac5.
Note: For machines exposed to the internet, it is a good idea to use non standard ports for services when you can. This will significantly cut down on ‘drive by hackers’ that just scan for standard ports. In this example, I run SSH on port 1022 on getac6 and 2022 on getac5. You can find instructions on how to configure SSH on different ports at the end of this tutorial.
Now that we have ports from the internet arriving at Router_2, we will need to forward them again to the specific machines on Network_2 that are running the services on these ports.
- Log into the settings page for Router_2.
- Find the port forwarding or firewall configuration section.
- Create a rule for the ports required for each of the services you require. In this case, the destination for a particular port will be the machine that is running that service.

In this example, there are three machines on Network_2:
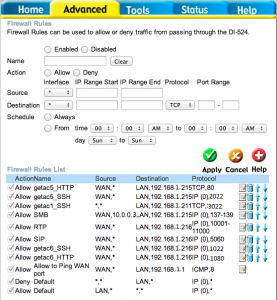
- getac6 is at 192.168.1.216. It is running the Asterisk telephone server with the FreePBX web application. Port 1022 is used for SSH on this machine and port 1080 is used for HTTP on this machine. The VOIP runs on port 5060 for connection requests, and 10001 through 11000 for active calls.
- getac 5 is at 192.168.1.215. It is running an apache web server that hosts LittleBytesOfPi.net. Port 2022 is used for SSH on this machine and the standard port 80 is used for the web server.
- getac1 is at 192.168.1.211. Because we did not forward port 3022 from Router_1 to Router_2, this machine is is currently not exposed to the internet. However, machines on the Network_1 LAN (in this case traffic coming from machines behind Router_3 on the private side of the network) can SSH into this machine on port 3022.
Note there is a rule allowing ports 137 through 139 to forward to getac5 at 192.168.1.215, but only from 10.0.0.3, which is the address of Router_3, which is the gateway to the private part of your LAN. This allows only computers from Network_3 to access the Samba file server running on getac5.
Configure Server Firewall
Now that connections can get from the internet to your server computers, the last step will be to open up the firewall ports required by the services. You could leave the firewall disabled on the server computer, but it is advisable to open up only those ports that are needed for the services you wish to allow.
There are a number of ways to configure a Linux machine firewall, including using the “iptables” command, or a graphical user interface. Perhaps the most straight forward method is to use the Linux tool Uncomplicated Firewall (ufw). This section describes how to use “ufw” to configure the firewall.
- Log into the server machine and open up a terminal
- Make sure ufw is installed by typing “ufw status”. If it is installed you will see something like:
$ ufw status
Status: inactive
- If ufw is not installed, do so by typing
$ sudo apt-get install ufw
- If you are connected to the machine by SSH, make sure that your SSH port is allowed before you turn on the firewall, or your current SSH session will be disconnected when you turn the firewall on. Add SSH port to the firewall rules:
$ ufw allow 22/tcp
Note, if you are using SSH on a different port, use the appropriate port number here
- Now activate the firewall:
$ ufw enable
- By default, the firewall is setup to allow all outgoing traffic, and deny all incomming traffic. To be sure, you could add the rules:
$ ufw default deny incoming
$ ufw default allow outgoing
- Now add the rules you need for this machine. Here are the rules added to the firewall of the server getac6 running Asterisk with the ports described in the previous section:
$ ufw allow 1022/tcp
$ ufw allow 1080/tcp
$ ufw allow  5060
$ ufw allow 10001:11000/udp
- Here are the rules added to the web server getac5 so that SSH and HTTP can be accessed by the ports forwarded from the internet.
$ ufw allow 2022/tcp
$ ufw allow 80/tcp
- Here are the additional rules added to getac5 to allow Samba, but only from the machines on our private network (coming from Route_3 at 10.0.0.3).
$ ufw allow from 10.0.0.3 proto tcp to any port 137:139
- When you are done adding rules, you should check the status to make sure all of your rules are correct:
$ ufw status
Status: active

To                         Action      From
--                         ------      ----
80                         ALLOW       Anywhere
137:139/tcp                ALLOW       10.0.0.3
2022/tcp                   ALLOW       Anywhere
- If you need to modify the rules, you can run “ufw status numbered”, and then use “ufw insert x” or “ufw delete x”, where x is the rule number:
$ ufw status numbered
Status: active

     To                         Action      From
     --                         ------      ----
[ 1] 22                         ALLOW IN    Anywhere
[ 2] 80                         ALLOW IN    Anywhere
[ 3] 137:139/tcp                ALLOW IN    10.0.0.3
[ 4] 3022/tcp                   ALLOW IN    Anywhere


$ ufw delete 1
Deleting:
 allow 22
Proceed with operation (y|n)?
More information about using UFW can be found on the manual page here: http://manpages.ubuntu.com/manpages/lucid/man8/ufw.8.html
Configure SSH on Custom Ports
Without any additional port forwarding, you could only SSH into your server machines from within their local network. You probably want to SSH into these machines from a machine on the private side of your network, or perhaps even from the internet. Because all of your servers are behind Router_2, you will have to use a different SSH port for each one that you need to forward outside ports to.
To setup SSH on alternate ports:
- Open a terminal session to the machine.
- Open the file /etc/ssh/sshd_config with your favorite text editor.
$ nano /etc/ssh/sshd_config
- The top of the file will look similar to this. Look for the line that says Port 22.
# Package generated configuration file
# See the sshd_config(5) manpage for details
# What ports, IPs and protocols we listen for
Port 22
- To allow SSH on different ports, add them below Port 22
# What ports, IPs and protocols we listen for
Port 22
Port 1022
# you could add additional ports
- If you want to disable SSH on the default port 22, then comment out that line
# What ports, IPs and protocols we listen for
# disable port 22
# Port 22
Port 1022
- Restart the SSH service to get the change to take effect
$ sudo /etc/init.d/sshd restart
Now that you have your router port forwarding and your firewall configured, you should next install some software to prevent the most common types of hacking attempts. Our next tutorial describes how to install and configure the fail2ban software to protect your computers against brute force attacks.